

How to Fix the ‘DNS Server Not Responding’ Error: Quick Solutions for Windows and Mac

Introduction to DNS and the Error
The “DNS server not responding” error is a prevalent issue in internet connectivity, disrupting users’ ability to access websites and online services. The Domain Name System (DNS) acts as the Internet’s phonebook, translating human-readable domain names (e.g., www.example.com) into numerical IP addresses that devices use to communicate. When the DNS server fails to respond, it means your device cannot resolve these domain names, leading to the error message. This issue can arise from various causes, including network connectivity problems, misconfigured settings, or ISP-related outages, and is particularly frustrating in an always-online world.
Common Causes of the Error
Understanding the root causes is crucial for effective troubleshooting. The following table summarizes the common causes identified across multiple sources, including N-able (March 2025) and Hostinger (November 2024):
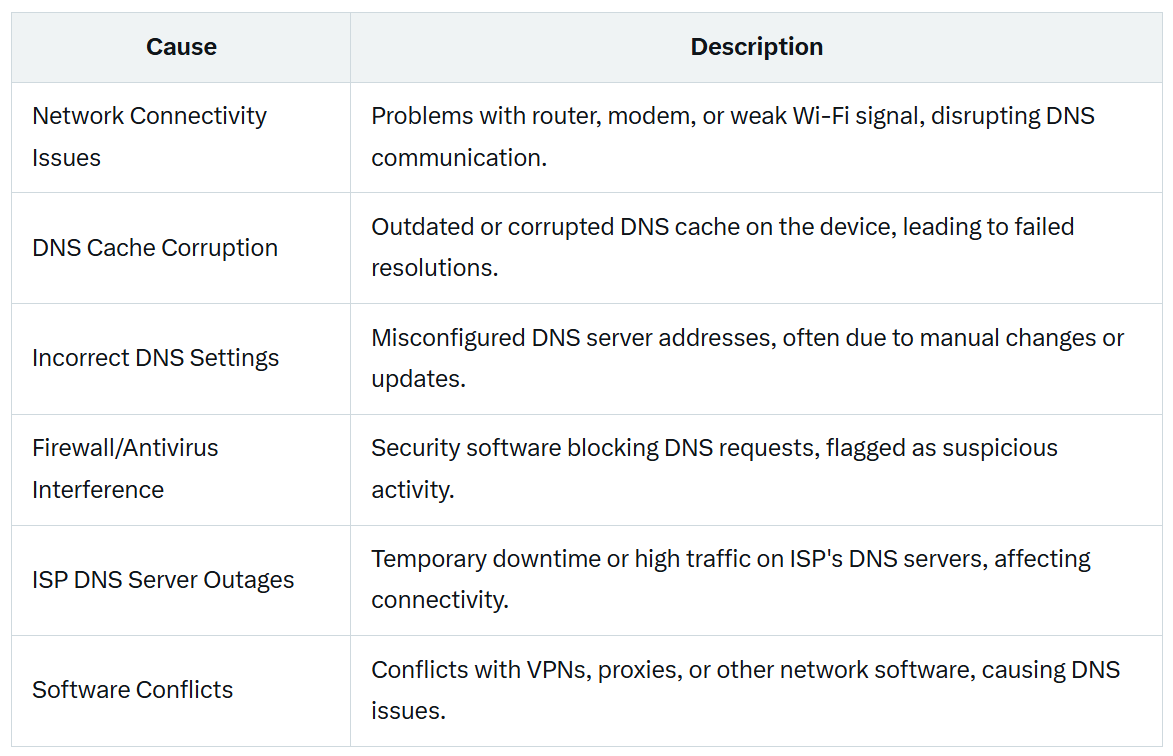
These causes can interact, making diagnosis complex. For instance, a recent X post from July 2025 (@phoenykz) noted that ISP-related DNS issues are common, reinforcing the need to check ISP status.
Detailed Solutions for Windows Users
For Windows users, the following steps, derived from sources like NinjaOne and Windows101tricks (May 2025), provide a comprehensive approach to resolving the error:
Restart the Router and Modem
- Unplug your router and modem from power, wait 30 seconds to 1 minute, then plug them back in. This refreshes the connection and can resolve temporary network issues, as suggested by NordVPN (June 2024).
Flush DNS Cache
- Open Command Prompt as Administrator (type cmd in the search bar, right-click, and select “Run as Administrator”).
- Type ipconfig /flushdns and press Enter to clear the DNS cache, then restart your computer. This step is crucial for resolving cache corruption, as noted in the Kinsta article (September 2024).
Change DNS Server
- Navigate to Control Panel > Network and Sharing Center > Change adapter settings.
- Right-click your active network connection (Wi-Fi or Ethernet) and select Properties.
- Select Internet Protocol Version 4 (TCP/IPv4) and click Properties.
- Choose “Use the following DNS server addresses” and enter 8.8.8.8 (preferred) and 8.8.4.4 (alternate) for Google DNS, or 1.1.1.1 and 1.0.0.1 for Cloudflare DNS. This is recommended by multiple sources, including Private Internet Access (July 2025).
Disable IPv6
- In the same Properties window, uncheck “Internet Protocol Version 6 (TCP/IPv6)” to test if IPv6 is causing conflicts, as suggested by NordVPN and Kinsta.
Reset TCP/IP Stack
- Open Command Prompt as Administrator and type netsh int ip reset, followed by netsh winsock reset, then press Enter after each command. Restart your computer to apply changes, an advanced solution from NinjaOne (May 2025).
Update Network Drivers
- Open Device Manager, expand Network adapters, right-click your network adapter, and select Update driver. Use automated tools like Driver Easy if manual updates are challenging, as per Kinsta’s recommendations.
Disable Firewall and Antivirus Temporarily
- Temporarily disable your firewall (e.g., Windows Defender Firewall via Settings > Update & Security > Windows Security) and antivirus to check for interference. Remember to re-enable them after testing, as advised by multiple sources.
Additional advanced solutions include using a different browser (e.g., switching from Chrome to Edge) and checking for ISP outages using tools like downforeveryoneorjustme.com, as mentioned in Namecheap’s guide.
Detailed Solutions for Mac Users
For Mac users, the steps, based on sources like Hostinger (November 2024) and runcloud.io (January 2025), are tailored to the macOS environment:
Restart the Router and Modem
- Follow the same process as Windows: unplug for 30 seconds, then plug back in, ensuring the modem connects first, then the router.
Flush DNS Cache
- Open Terminal (search for it via Spotlight).
- Type sudo dscacheutil -flushcache and press Enter, then enter your administrator password. For older macOS versions, commands like sudo killall -HUP mDNSResponder may be needed, as per NordVPN.
Change DNS Server
- Go to System Preferences > Network, select your active connection, and click Advanced.
- Under the DNS tab, remove existing entries and add 8.8.8.8 and 8.8.4.4, then click OK and Apply. This aligns with recommendations from Private Internet Access.
Renew DHCP Lease
- In Network preferences, select your connection, click Advanced, go to the TCP/IP tab, and click Renew DHCP Lease to refresh your IP address, a step from Bluehost (January 2025).
Disable IPv6
- Open Terminal and type networksetup -setv6off Wi-Fi (or Ethernet, depending on your connection) to disable IPv6, testing if it resolves the issue, as per Kinsta.
Mac users can also try advanced solutions like using a VPN or checking for ISP outages, similar to Windows users.
Advanced Solutions and Tools
For users where basic and intermediate solutions fail, advanced options include:
- Using a Different Browser: Test with alternatives like Firefox or Edge to isolate browser-specific issues, as suggested by Collabnix (July 2024).
- Checking for ISP Outages: Visit your ISP’s status page or use tools like downforeveryoneorjustme.com to confirm if the issue is on their end or from Namecheap.
- Using a VPN: A VPN can bypass DNS issues by routing traffic through different servers, noted in Private Internet Access (July 2025) and a bonus tip from DriverEasy (December 2023).
Recent X posts, such as one from @Skyb0rg (July 2025), suggest using DNS-over-HTTPS for enhanced security, which can be an option for advanced users.
Prevention Strategies
To minimize future occurrences, consider the following, based on insights from NinjaOne and DreamHost:
- Regularly restart your router and modem to clear temporary issues.
- Use public DNS servers like Google DNS (8.8.8.8) or Cloudflare DNS (1.1.1.1) for reliability, as they are less prone to outages than ISP DNS.
- Keep your operating system and network drivers updated to avoid compatibility issues.
- Avoid using multiple network connections simultaneously to prevent conflicts.
NinjaOne (May 2025) also recommends using tools like their 14-day free trial for IT professionals to manage DNS issues efficiently, though this is more relevant for enterprise settings.
Conclusion
The “DNS server not responding” error, while common, can be resolved with the steps outlined above. Research suggests that most users can fix the issue with basic troubleshooting, but persistent problems may require contacting your ISP or seeking professional help, especially if ISP outages are confirmed.
